This is the multi-page printable view of this section. Click here to print.
Integrations
- 1: Altinity Cloud Access Management
- 2: ClickHouse® python drivers
- 3: MySQL
- 4: ODBC Driver for ClickHouse®
- 5: ClickHouse® + Spark
- 6: BI Tools
- 7: CatBoost / MindsDB / Fast.ai
- 8: Google S3 (GCS)
- 9: Kafka engine
- 9.1: Fundamentals
- 9.1.1: Config by provider
- 9.1.2: Kafka engine Virtual columns
- 9.1.3: Adjusting librdkafka settings
- 9.1.4: Kafka main parsing loop
- 9.1.5: SELECTs from engine=Kafka
- 9.2: Consumption Patterns
- 9.2.1: Exactly once semantics
- 9.2.2: Kafka parallel consuming
- 9.2.3: Multiple MVs attached to Kafka table
- 9.2.4: Rewind / fast-forward / replay
- 9.3: Schema and Formats
- 9.4: Operations and Troubleshooting
- 10: RabbitMQ
- 10.1: RabbitMQ Error handling
1 - Altinity Cloud Access Management
Organizations that want to enable administrative users in their Altinity.Cloud ClickHouse® servers can do so by enabling access_management manually. This allows for administrative users to be created on the specific ClickHouse Cluster.
WARNING
Modifying the ClickHouse cluster settings manually can lead to the cluster not loading or other issues. Change settings only with full consultation with an Altinity.Cloud support team member, and be ready to remove settings if they cause any disruption of service.To add the access_management setting to an Altinity.Cloud ClickHouse Cluster:
Log into your Altinity.Cloud account.
For the cluster to modify, select Configure -> Settings.
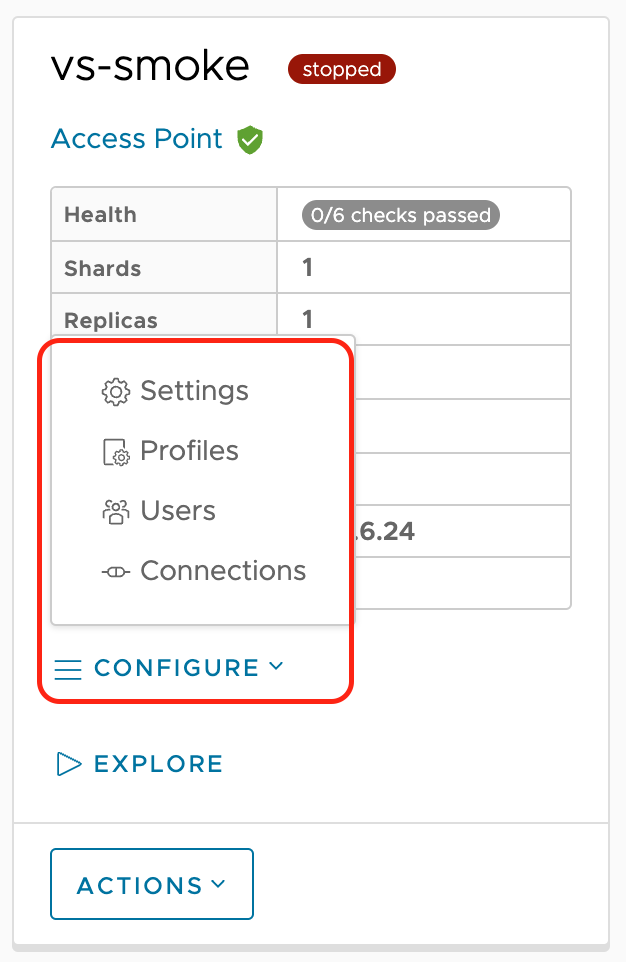
Cluster setting configure
From the Settings page, select +ADD SETTING.

Add cluster setting
Set the following options:
Setting Type: Select users.d file.
Filename:
access_management.xmlContents: Enter the following to allow the
clickhouse_operatorthat controls the cluster through theclickhouse-operatorthe ability to set administrative options:<clickhouse> <users> <admin> <access_management>1</access_management> </admin> <clickhouse_operator> <access_management>1</access_management> </clickhouse_operator> </users> </clickhouse>
access_management=1 means that users admin, clickhouse_operator are able to create users and grant them privileges using SQL.
Select OK. The cluster will restart, and users can now be created in the cluster that can be granted administrative access.
If you are running ClickHouse 21.9 and above you can enable storing access management in ZooKeeper. in this case it will be automatically propagated to the cluster. This requires yet another configuration file:
Setting Type: Select config.d file
Filename:
user_directories.xmlContents:
<clickhouse>
  <user_directories replace="replace">
    <users_xml>
      <path>/etc/clickhouse-server/users.xml</path>
    </users_xml>
    <replicated>
      <zookeeper_path>/clickhouse/access/</zookeeper_path>
    </replicated>
    <local_directory>
       <path>/var/lib/clickhouse/access/</path>
    </local_directory>
  </user_directories>
</clickhouse>
2 - ClickHouse® python drivers
There are two main python drivers that can be used with ClickHouse. They all have their different set of features and use cases:
ClickHouse driver AKA clickhouse-driver
The clickhouse-driver is a Python library used for interacting with ClickHouse. Here’s a summary of its features:
- Connectivity:
clickhouse-driverallows Python applications to connect to ClickHouse servers over TCP/IP Native Interface (9000/9440 ports) and also HTTP interface but it is experimental. - SQL Queries: It enables executing SQL queries against ClickHouse databases from Python scripts, including data manipulation (insertion, deletion, updating) and data retrieval (select queries).
- Query Parameters: Supports parameterized queries, which helps in preventing SQL injection attacks and allows for more efficient execution of repeated queries with different parameter values.
- Connection Pooling: Provides support for connection pooling, which helps manage connections efficiently, especially in high-concurrency applications, by reusing existing connections instead of creating new ones for each query.
- Data Types: Handles conversion between Python data types and ClickHouse data types, ensuring compatibility and consistency when passing data between Python and ClickHouse.
- Error Handling: Offers comprehensive error handling mechanisms, including exceptions and error codes, to facilitate graceful error recovery and handling in Python applications.
- Asynchronous Support: Supports asynchronous execution of queries using
asyncio, allowing for non-blocking query execution in asynchronous Python applications. - Customization: Provides options for customizing connection settings, query execution behavior, and other parameters to suit specific application requirements and performance considerations.
- Compatibility: Works with various versions of ClickHouse, ensuring compatibility and support for different ClickHouse features and functionalities.
- Documentation and Community: Offers comprehensive documentation and active community support, including examples, tutorials, and forums, to assist developers in effectively using the library and addressing any issues or questions they may have.
- Supports multiple host on connection string https://clickhouse-driver.readthedocs.io/en/latest/features.html#multiple-hosts
- Connection pooling (aiohttp)
Python ecosystem libs/modules:
- Good Pandas/Numpy support: https://clickhouse-driver.readthedocs.io/en/latest/features.html#numpy-pandas-support
- Good SQLALchemy support: https://pypi.org/project/clickhouse-sqlalchemy/
This was the first python driver for ClickHouse. It has a mature codebase. By default ClickHouse drivers uses synchronous code . There is a wrapper to convert code to asynchronous, https://github.com/long2ice/asynch
Here you can get a basic working example from Altinity repo for ingestion/selection using clickhouse-driver:
https://github.com/lesandie/clickhouse-tests/blob/main/scripts/test_ch_driver.py
ClickHouse-connect AKA clickhouse-connect
The ClickHouse Connect Python driver is the ClickHouse, Inc supported-official Python library. Here’s a summary of its key features:
- Connectivity: allows Python applications to connect to ClickHouse servers over HTTP Interface (8123/8443 ports).
- Compatibility: The driver is compatible with Python 3.x versions, ensuring that it can be used with modern Python applications without compatibility issues.
- Performance: The driver is optimized for performance, allowing for efficient communication with ClickHouse databases to execute queries and retrieve results quickly, which is crucial for applications requiring low latency and high throughput.
- Query Execution: Developers can use the driver to execute SQL queries against ClickHouse databases, including SELECT, INSERT, UPDATE, DELETE, and other SQL operations, enabling them to perform various data manipulation tasks from Python applications.
- Parameterized Queries: The driver supports parameterized queries, allowing developers to safely pass parameters to SQL queries to prevent SQL injection attacks and improve query performance by reusing query execution plans.
- Data Type Conversion: The driver automatically handles data type conversion between Python data types and ClickHouse data types, ensuring seamless integration between Python applications and ClickHouse databases without manual data type conversion.
- Error Handling: The driver provides robust error handling mechanisms, including exceptions and error codes, to help developers handle errors gracefully and take appropriate actions based on the type of error encountered during query execution.
- Limited Asynchronous Support: Some implementations of the driver offer asynchronous support, allowing developers to execute queries asynchronously to improve concurrency and scalability in asynchronous Python applications using asynchronous I/O frameworks like
asyncio. - Configuration Options: The driver offers various configuration options, such as connection parameters, authentication methods, and connection pooling settings, allowing developers to customize the driver’s behavior to suit their specific requirements and environment.
- Documentation and Community: Offers comprehensive documentation and active community support, including examples, tutorials, and forums, to assist developers in effectively using the library and addressing any issues or questions they may have. https://clickhouse.com/docs/en/integrations/language-clients/python/intro/
- Multiple host on connection string not supported https://github.com/ClickHouse/clickhouse-connect/issues/74
- Connection pooling (urllib3)
Python ecosystem libs/modules:
- Good Pandas/Numpy support: https://clickhouse.com/docs/en/integrations/python#consuming-query-results-with-numpy-pandas-or-arrow
- Decent SQLAlchemy 1.3 and 1.4 support (limited feature set)
It is the most recent driver with the latest feature set (query context and query streaming …. ), and in recent release asyncio wrapper
You can check multiple official examples here:
Also some Altinity examples from repo:
https://github.com/lesandie/clickhouse-tests/blob/main/scripts/test_ch_connect_asyncio_insert.py
You can clone the repo and use the helper files like DDL.sql to setup some tests.
Most common use cases:
Connection pooler:
- Clickhouse-connect can use a connection pooler (based on urllib3) https://clickhouse.com/docs/en/integrations/python#customizing-the-http-connection-pool
- Clickhouse-driver you can use aiohttp (https://docs.aiohttp.org/en/stable/client_advanced.html#limiting-connection-pool-size )
Managing ClickHouse session_id:
clickhouse-driver
- Because it is using the Native Interface
session_idis managed internally by clickhouse, so it is very rare (unless using asyncio) to get:
Code: 373. DB::Exception: Session is locked by a concurrent client. (SESSION_IS_LOCKED).- Because it is using the Native Interface
clickhouse-connect: How to use clickhouse-connect in a pythonic way and avoid getting
SESSION_IS_LOCKEDexceptions:- https://clickhouse.com/docs/en/integrations/python#managing-clickhouse-session-ids
- If you want to specify a session_id per query you should be able to use the setting dictionary to pass a
session_idfor each query (note that ClickHouse will automatically generate asession_idif none is provided).
SETTINGS = {"session_id": "dagster-batch" + "-" + f"{time.time()}"}
client.query("INSERT INTO table ....", settings=SETTINGS)
Also in clickhouse documentation some explanation how to set session_id with another approach: https://clickhouse.com/docs/en/integrations/python#managing-clickhouse-session-ids
ClickHouse Connect Driver API | ClickHouse Docs
Best practices with flask · Issue #73 · ClickHouse/clickhouse-connect
Asyncio (asynchronous wrappers)
clickhouse-connect
New release with asyncio wrapper for clickhouse-connect
How the wrapper works: https://clickhouse.com/docs/en/integrations/python#asyncclient-wrapper
Wrapper and connection pooler example:
import clickhouse_connect
import asyncio
from clickhouse_connect.driver.httputil import get_pool_manager

async def main():
    client = await clickhouse_connect.get_async_client(host='localhost', port=8123, pool_mgr=get_pool_manager())
    for i in range(100):
        result = await client.query("SELECT name FROM system.databases")
        print(result.result_rows)

asyncio.run(main())
clickhouse-connect code is synchronous by default and running synchronous functions in an async application is a workaround and might not be as efficient as using a library/wrapper designed for asynchronous operations from the ground up.. So you can use the current wrapper or you can use another approach with asyncio and concurrent.futures and ThreadpoolExecutor or ProcessPoolExecutor. Python GIL has a mutex over Threads but not to Processes so if you need performance at the cost of using processes instead of threads (not much different for medium workloads) you can use ProcesspoolExecutor instead.
Some info about this from the tinybird guys https://www.tinybird.co/blog-posts/killing-the-processpoolexecutor
For clickhouse-connect :
import asyncio
from concurrent.futures import ProcessPoolExecutor
import clickhouse_connect

# Function to execute a query using clickhouse-connect synchronously
def execute_query_sync(query):
    client = clickhouse_connect.get_client()  # Adjust connection params as needed
    result = client.query(query)
    return result

# Asynchronous wrapper function to run the synchronous function in a process pool
async def execute_query_async(query):
    loop = asyncio.get_running_loop()
    # Use ProcessPoolExecutor to execute the synchronous function
    with ProcessPoolExecutor() as pool:
        result = await loop.run_in_executor(pool, execute_query_sync, query)
        return result

async def main():
    query = "SELECT * FROM your_table LIMIT 10"  # Example query
    result = await execute_query_async(query)
    print(result)

# Run the async main function
if __name__ == '__main__':
    asyncio.run(main())
Clickhouse-driver
clickhouse-driver code is also synchronous and suffers the same problem as clickhouse-connect https://clickhouse-driver.readthedocs.io/en/latest/quickstart.html#async-and-multithreading
So to use asynchronous approach it is recommended to use a connection pool and some asyncio wrapper that can hide the complexity of using the ThreadPoolExecutor/ProcessPoolExecutor
To begin testing such environment aiohttp is a good approach. Here an example: https://github.com/lesandie/clickhouse-tests/blob/main/scripts/test_aiohttp_inserts.py This will use simply requests module and aiohttp (you can tune the connection pooler https://docs.aiohttp.org/en/stable/client_advanced.html#limiting-connection-pool-size )
Also
aiochclientis another good wrapper https://github.com/maximdanilchenko/aiochclient for the HTTP interfaceFor the native interface you can try https://github.com/long2ice/asynch ,
asynchis an asyncio ClickHouse Python Driver with native (TCP) interface support, which reuse most of clickhouse-driver and comply with PEP249 .
3 - MySQL
Replication using MaterializeMySQL.
- https://clickhouse.com/docs/en/engines/database-engines/materialized-mysql
- https://translate.google.com/translate?sl=auto&tl=en&u=https://www.jianshu.com/p/d0d4306411b3
- https://raw.githubusercontent.com/ClickHouse/clickhouse-presentations/master/meetup47/materialize_mysql.pdf
It reads mysql binlog directly and transform queries into something which ClickHouse® can support. Supports updates and deletes (under the hood implemented via something like ReplacingMergeTree with enforced FINAL and ‘deleted’ flag). Status is ’experimental’, there are quite a lot of known limitations and issues, but some people use it. The original author of that went to another project, and the main team don’t have a lot of resource to improve that for now (more important thing in the backlog)
The replication happens on the mysql database level.
Replication using debezium + Kafka (+ Altinity Sink Connector for ClickHouse)
Debezium can read the binlog and transform it to Kafka messages.
You can later capture the stream of message on ClickHouse side and process it as you like. Please remember that currently Kafka engine supports only at-least-once delivery guarantees. It’s used by several companies, quite nice & flexible. But initial setup may require some efforts.
Altinity Sink Connector for ClickHouse
Can handle transformation of debezium messages (with support for DELETEs and UPDATEs) and exactly-once delivery for you.
Links:
- https://altinity.com/blog/fast-mysql-to-clickhouse-replication-announcing-the-altinity-sink-connector-for-clickhouse
- https://altinity.com/mysql-to-clickhouse/
- https://github.com/Altinity/clickhouse-sink-connector
Same as above but using https://maxwells-daemon.io/ instead of debezium.
Have no experience / feedback there, but should be very similar to debezium.
Replication using clickhouse-mysql
See https://altinity.com/blog/2018/6/30/realtime-mysql-clickhouse-replication-in-practice
That was done long time ago in altinity for one use-case, and it seem like it was never used outside of that. It’s a python application with lot of switches which can copy a schema or read binlog from mysql and put it to ClickHouse. Not supported currently. But it’s just a python, so maybe can be adjusted to different needs.
Accessing MySQL data via integration engines from inside ClickHouse.
MySQL table engine / table function , or MySQL database engine - ClickHouse just connects to mysql server as a client, and can do normal selects.
We had webinar about that a year ago: https://www.youtube.com/watch?v=44kO3UzIDLI
Using that you can easily create some ETL script which will copy the data from mysql to ClickHouse regularly, i.e. something like
INSERT INTO clickhouse_table SELECT * FROM mysql_table WHERE id > ...
Works great if you have append only table in MySQL.
In newer ClickHouse versions you can query this was also sharded / replicated MySQL cluster - see ExternalDistributed
MySQL dictionaries
There are also MySQL dictionaries, which can be very nice alternative for storing some dimensions information in star schema.
- https://clickhouse.com/docs/en/sql-reference/dictionaries/external-dictionaries/external-dicts-dict-sources/#dicts-external_dicts_dict_sources-mysql
- https://github.com/ClickHouse/ClickHouse/blob/9f5cd35a6963cc556a51218b46b0754dcac7306a/tests/testflows/aes_encryption/tests/compatibility/mysql/dictionary.py#L35-L51
4 - ODBC Driver for ClickHouse®
ODBC interface for ClickHouse® RDBMS.
Licensed under the Apache 2.0 .
Installation and usage
Windows
- Download the latest release . On 64bit system you usually need both 32 bit and 64 bit drivers.
- Install (usually you will need ANSI driver, but better to install both versions, see below).
- Configure ClickHouse DSN.
Note: that install driver linked against MDAC (which is default for Windows), some non-windows native applications (cygwin / msys64 based) may require driver linked against unixodbc. Build section below.
MacOS
- Install homebrew .
- Install driver
brew install https://raw.githubusercontent.com/proller/homebrew-core/chodbc/Formula/clickhouse-odbc.rb
- Add ClickHouse DSN configuration into ~/.odbc.ini file. (sample )
Note: that install driver linked against iodbc (which is default for Mac), some homebrew applications (like python) may require unixodbc driver to work properly. In that case see Build section below.
Linux
- DEB/RPM packaging is not provided yet, please build & install the driver from sources.
- Add ClickHouse DSN configuration into ~/.odbc.ini file. (sample )
Configuration
On Linux / Max you configure DSN by adding new desctions in ~/.odbc.ini (See sample file: https://github.com/ClickHouse/clickhouse-odbc/blob/fd74398b50201ab13b535cdfab57bca86e588b37/packaging/odbc.ini.sample )
On Windows you can create/edit DSN using GUI tool through Control Panel.
The list of DSN parameters recognized by the driver is as follows:
| Parameter | Default value | Description |
|---|---|---|
Url | empty | URL that points to a running ClickHouse instance, may include username, password, port, database, etc. |
Proto | deduced from Url, or from Port and SSLMode: https if 443 or 8443 or SSLMode is not empty, http otherwise | Protocol, one of: http, https |
Server or Host | deduced from Url | IP or hostname of a server with a running ClickHouse instance on it |
Port | deduced from Url, or from Proto: 8443 if https, 8123 otherwise | Port on which the ClickHouse instance is listening |
Path | /query | Path portion of the URL |
UID or Username | default | User name |
PWD or Password | empty | Password |
Database | default | Database name to connect to |
Timeout | 30 | Connection timeout |
SSLMode | empty | Certificate verification method (used by TLS/SSL connections, ignored in Windows), one of: allow, prefer, require, use allow to enable SSL_VERIFY_PEER
TLS/SSL certificate verification mode, SSL_VERIFY_PEER | SSL_VERIFY_FAIL_IF_NO_PEER_CERT
is used otherwise |
PrivateKeyFile | empty | Path to private key file (used by TLS/SSL connections), can be empty if no private key file is used |
CertificateFile | empty | Path to certificate file (used by TLS/SSL connections, ignored in Windows), if the private key and the certificate are stored in the same file, this can be empty if PrivateKeyFile is specified |
CALocation | empty | Path to the file or directory containing the CA/root certificates (used by TLS/SSL connections, ignored in Windows) |
DriverLog | on if CMAKE_BUILD_TYPE is Debug, off otherwise | Enable or disable the extended driver logging |
DriverLogFile | \temp\clickhouse-odbc-driver.log on Windows, /tmp/clickhouse-odbc-driver.log otherwise | Path to the extended driver log file (used when DriverLog is on) |
Troubleshooting & bug reporting
If some software doesn’t work properly with that driver, but works good with other drivers - we will be appropriate if you will be able to collect debug info.
To debug issues with the driver, first things that need to be done are:
- enabling driver manager tracing. Links may contain some irrelevant vendor-specific details.
- enabling driver logging, see
DriverLogandDriverLogFileDSN parameters above - making sure that the application is allowed to create and write these driver log and driver manager trace files
- follow the steps leading to the issue.
Collected log files will help to diagnose & solve the issue.
Driver Managers
Note, that since ODBC drivers are not used directly by a user, but rather accessed through applications, which in their turn access the driver through ODBC driver manager, user have to install the driver for the same architecture (32- or 64-bit) as the application that is going to access the driver. Moreover, both the driver and the application must be compiled for (and actually use during run-time) the same ODBC driver manager implementation (we call them “ODBC providers” here). There are three supported ODBC providers:
- ODBC driver manager associated with MDAC (Microsoft Data Access Components, sometimes referenced as WDAC, Windows Data Access Components) - the standard ODBC provider of Windows
- UnixODBC - the most common ODBC provider in Unix-like systems. Theoretically, could be used in Cygwin or MSYS/MinGW environments in Windows too.
- iODBC - less common ODBC provider, mainly used in Unix-like systems, however, it is the standard ODBC provider in macOS. Theoretically, could be used in Cygwin or MSYS/MinGW environments in Windows too.
If you don’t see a package that matches your platforms, or the version of your system is significantly different than those of the available packages, or maybe you want to try a bleeding edge version of the code that hasn’t been released yet, you can always build the driver manually from sources.
Note, that it is always a good idea to install the driver from the corresponding native package (.msi, etc., which you can also easily create if you are building from sources), than use the binaries that were manually copied to some folder.
Building from sources
The general requirements for building the driver from sources are as follows:
- CMake 3.12 and later
- C++17 and C11 capable compiler toolchain:
- Clang 4 and later
- GCC 7 and later
- Xcode 10 and later
- Microsoft Visual Studio 2017 and later
- ODBC Driver manager (MDAC / unixodbc / iODBC)
- SSL library (openssl)
Generic build scenario:
git clone --recursive git@github.com:ClickHouse/clickhouse-odbc.git
cd clickhouse-odbc
mkdir build
cd build
cmake -DCMAKE_BUILD_TYPE=RelWithDebInfo ..
cmake --build . -C RelWithDebInfo
Additional requirements exist for each platform, which also depend on whether packaging and/or testing is performed.
Linux/macOS
Execute the following in the terminal to install needed dependencies:
# on Red Hat/CentOS (tested on CentOS 7)
sudo yum groupinstall "Development Tools"
sudo yum install centos-release-scl
sudo yum install devtoolset-8
sudo yum install git cmake openssl-devel unixODBC-devel # You may use libiodbc-devel INSTEAD of unixODBC-devel
scl enable devtoolset-8 -- bash # Enable Software collections for that terminal session, to use newer versions of complilers

# on Ubuntu (tested on Ubuntu 18.10, for older versions you may need to install newer c++ compiler and cmake versions)
sudo apt install build-essential git cmake libpoco-dev libssl-dev unixodbc-dev # You may use libiodbc-devel INSEAD of unixODBC-devel

# MacOS:
# You will need Xcode 10 or later and Command Line Tools to be installed, as well as [Homebrew](https://brew.sh/).
brew install git cmake make poco openssl libiodbc # You may use unixodbc INSTEAD of libiodbc
Note: usually on Linux you use unixODBC driver manager, and on Mac - iODBC. In some (rare) cases you may need use other driver manager, please do it only if you clearly understand the differences. Driver should be used with the driver manager it was linked to.
Clone the repo with submodules:
git clone --recursive git@github.com:ClickHouse/clickhouse-odbc.git
Enter the cloned source tree, create a temporary build folder, and generate a Makefile for the project in it:
cd clickhouse-odbc
mkdir build
cd build

# Configuration options for the project can be specified in the next command in a form of '-Dopt=val'
# For MacOS: you may also add '-G Xcode' to the next command, in order to use Xcode as a build system or IDE, and generate the solution and project files instead of Makefile.
cmake -DCMAKE_BUILD_TYPE=RelWithDebInfo ..
Build the generated solution in-place:
cmake --build . -C RelWithDebInfo
cmake --build . -C RelWithDebInfo --target package
…and, optionally, run tests (note, that for non-unit tests, preconfigured driver and DSN entries must exist, that point to the binaries generated in this build folder):
cmake --build . -C RelWithDebInfo --target test
For MacOS: if you configured the project with ‘-G Xcode’ initially, open the IDE and build all, package, and test targets manually from there
cmake --open .
Windows
CMake bundled with the recent versions of Visual Studio can be used.
An SDK required for building the ODBC driver is included in Windows SDK, which in its turn is also bundled with Visual Studio.
You will need to install WiX toolset to be able to generate .msi packages. You can download and install it from WiX toolset home page
.
All of the following commands have to be issued in Visual Studio Command Prompt:
- use
x86 Native Tools Command Prompt for VS 2019or equivalent for 32-bit builds - use
x64 Native Tools Command Prompt for VS 2019or equivalent for 64-bit builds
Clone the repo with submodules:
git clone --recursive git@github.com:ClickHouse/clickhouse-odbc.git
Enter the cloned source tree, create a temporary build folder, and generate the solution and project files in it:
cd clickhouse-odbc
mkdir build
cd build

# Configuration options for the project can be specified in the next command in a form of '-Dopt=val'

# Use the following command for 32-bit build only.
cmake -A Win32 -DCMAKE_BUILD_TYPE=RelWithDebInfo ..

# Use the following command for 64-bit build only.
cmake -A x64 -DCMAKE_BUILD_TYPE=RelWithDebInfo ..
Build the generated solution in-place:
cmake --build . -C RelWithDebInfo
cmake --build . -C RelWithDebInfo --target package
…and, optionally, run tests (note, that for non-unit tests, preconfigured driver and DSN entries must exist, that point to the binaries generated in this build folder):
cmake --build . -C RelWithDebInfo --target test
…or open the IDE and build all, package, and test targets manually from there:
cmake --open .
cmake options
The list of configuration options recognized during the CMake generation step is as follows:
| Option | Default value | Description |
|---|---|---|
CMAKE_BUILD_TYPE | RelWithDebInfo | Build type, one of: Debug, Release, RelWithDebInfo |
CH_ODBC_ENABLE_SSL | ON | Enable TLS/SSL (required for utilizing https:// interface, etc.) |
CH_ODBC_ENABLE_INSTALL | ON | Enable install targets (required for packaging) |
CH_ODBC_ENABLE_TESTING | inherits value of BUILD_TESTING | Enable test targets |
CH_ODBC_PREFER_BUNDLED_THIRD_PARTIES | ON | Prefer bundled over system variants of third party libraries |
CH_ODBC_PREFER_BUNDLED_POCO | inherits value of CH_ODBC_PREFER_BUNDLED_THIRD_PARTIES | Prefer bundled over system variants of Poco library |
CH_ODBC_PREFER_BUNDLED_SSL | inherits value of CH_ODBC_PREFER_BUNDLED_POCO | Prefer bundled over system variants of TLS/SSL library |
CH_ODBC_PREFER_BUNDLED_GOOGLETEST | inherits value of CH_ODBC_PREFER_BUNDLED_THIRD_PARTIES | Prefer bundled over system variants of Google Test library |
CH_ODBC_PREFER_BUNDLED_NANODBC | inherits value of CH_ODBC_PREFER_BUNDLED_THIRD_PARTIES | Prefer bundled over system variants of nanodbc library |
CH_ODBC_RUNTIME_LINK_STATIC | OFF | Link with compiler and language runtime statically |
CH_ODBC_THIRD_PARTY_LINK_STATIC | ON | Link with third party libraries statically |
CH_ODBC_DEFAULT_DSN_ANSI | ClickHouse DSN (ANSI) | Default ANSI DSN name |
CH_ODBC_DEFAULT_DSN_UNICODE | ClickHouse DSN (Unicode) | Default Unicode DSN name |
TEST_DSN | inherits value of CH_ODBC_DEFAULT_DSN_ANSI | ANSI DSN name to use in tests |
TEST_DSN_W | inherits value of CH_ODBC_DEFAULT_DSN_UNICODE | Unicode DSN name to use in tests |
Packaging / redistributing the driver
You can just copy the library to another computer, in that case you need to
- install run-time dependencies on target computer
- Windows:
- MDAC driver manager (preinstalled on all modern Windows systems)
C++ Redistributable for Visual Studio 2017or same for2019, etc.
- Linux
- Windows:
# CentOS / RedHat
sudo yum install openssl unixODBC

# Debian/Ubuntu
sudo apt install openssl unixodbc
- MacOS (assuming you have Homebrew installed):
brew install poco openssl libiodbc
- register the driver so that the corresponding ODBC provider is able to locate it.
All this involves modifying a dedicated registry keys in case of MDAC, or editing odbcinst.ini (for driver registration) and odbc.ini (for DSN definition) files for UnixODBC or iODBC, directly or indirectly.
This will be done automatically using some default values if you are installing the driver using native installers.
Otherwise, if you are configuring manually, or need to modify the default configuration created by the installer, please see the exact locations of files (or registry keys) that need to be modified.
5 - ClickHouse® + Spark
jdbc
The trivial & natural way to talk to ClickHouse from Spark is using jdbc. There are 2 jdbc drivers:
- https://github.com/ClickHouse/clickhouse-jdbc/
- https://github.com/housepower/ClickHouse-Native-JDBC#integration-with-spark
ClickHouse-Native-JDBC has some hints about integration with Spark even in the main README file.
‘Official’ driver does support some conversion of complex data types (Roaring bitmaps) for Spark-ClickHouse integration: https://github.com/ClickHouse/clickhouse-jdbc/pull/596
But proper partitioning of the data (to spark partitions) may be tricky with jdbc.
Some example snippets:
- https://markelic.de/how-to-access-your-clickhouse-database-with-spark-in-python/
- https://stackoverflow.com/questions/60448877/how-can-i-write-spark-dataframe-to-clickhouse
Connectors
- https://github.com/DmitryBe/spark-clickhouse (looks dead)
- https://github.com/VaBezruchko/spark-clickhouse-connector (is not actively maintained).
- https://github.com/housepower/spark-clickhouse-connector (actively developing connector from housepower - same guys as authors of ClickHouse-Native-JDBC)
via Kafka
ClickHouse can produce / consume data from/to Kafka to exchange data with Spark.
via hdfs
You can load data into hadoop/hdfs using sequence of statements like INSERT INTO FUNCTION hdfs(...) SELECT ... FROM clickhouse_table
later process the data from hdfs by spark and do the same in reverse direction.
via s3
Similar to above but using s3.
via shell calls
You can call other commands from Spark. Those commands can be clickhouse-client and/or clickhouse-local.
do you really need Spark? :)
In many cases you can do everything inside ClickHouse without Spark help :) Arrays, Higher-order functions, machine learning, integration with lot of different things including the possibility to run some external code using executable dictionaries or UDF.
More info + some unordered links (mostly in Chinese / Russian)
- Spark + ClickHouse: not a fight, but a symbiosis (Russian) https://github.com/ClickHouse/clickhouse-presentations/blob/master/meetup28/spark_and_clickhouse.pdf (russian)
- Using a bunch of ClickHouse and Spark in MFI Soft (Russian) https://www.youtube.com/watch?v=ID8eTnmag0s (russian)
- Spark read and write ClickHouse (Chinese: Spark读写ClickHouse) https://yerias.github.io/2020/12/08/clickhouse/9/#Jdbc%E6%93%8D%E4%BD%9Cclickhouse
- Spark JDBC write ClickHouse operation summary (Chinese: Spark JDBC 写 ClickHouse 操作总结) https://www.jianshu.com/p/43f78c8a025b?hmsr=toutiao.io&utm_campaign=toutiao.io&utm_medium=toutiao.io&utm_source=toutiao.io
- Spark-sql is based on ClickHouse’s DataSourceV2 data source extension (Chinese: spark-sql基于ClickHouse的DataSourceV2数据源扩展) https://www.cnblogs.com/mengyao/p/4689866.html
- Alibaba integration instructions (English) https://www.alibabacloud.com/help/doc-detail/191192.htm
- Tencent integration instructions (English) https://intl.cloud.tencent.com/document/product/1026/35884
- Yandex DataProc demo: loading files from S3 to ClickHouse with Spark (Russian) https://www.youtube.com/watch?v=N3bZW0_rRzI
- ClickHouse official documentation_Spark JDBC writes some pits of ClickHouse (Chinese: ClickHouse官方文档_Spark JDBC写ClickHouse的一些坑) https://blog.csdn.net/weixin_39615984/article/details/111206050
- ClickHouse data import: Flink, Spark, Kafka, MySQL, Hive (Chinese: 篇五|ClickHouse数据导入 Flink、Spark、Kafka、MySQL、Hive) https://zhuanlan.zhihu.com/p/299094269
- SPARK-CLICKHOUSE-ES REAL-TIME PROJECT EIGHTH DAY-PRECISE ONE-TIME CONSUMPTION SAVE OFFSET. (Chinese: SPARK-CLICKHOUSE-ES实时项目第八天-精确一次性消费保存偏移量) https://www.freesion.com/article/71421322524/
- HDFS+ClickHouse+Spark: A lightweight big data analysis system from 0 to 1. (Chinese: HDFS+ClickHouse+Spark:从0到1实现一款轻量级大数据分析系统) https://juejin.cn/post/6850418114962653198
- ClickHouse Clustering for Spark Developer (English) http://blog.madhukaraphatak.com/clickouse-clustering-spark-developer/
- «Иногда приходится заглядывать в код Spark»: Александр Морозов (SEMrush) об использовании Scala, Spark и ClickHouse. (Russian) https://habr.com/ru/company/jugru/blog/341288/
6 - BI Tools
- Superset: https://superset.apache.org/docs/databases/clickhouse
- Metabase: https://github.com/enqueue/metabase-clickhouse-driver
- Querybook: https://www.querybook.org/docs/setup_guide/connect_to_query_engines/#all-query-engines
- Tableau: Altinity Tableau Connector for ClickHouse® support both JDBC & ODBC drivers
- Looker: https://docs.looker.com/setup-and-management/database-config/clickhouse
- Apache Zeppelin
- SeekTable
- ReDash
- Mondrian: https://altinity.com/blog/accessing-clickhouse-from-excel-using-mondrian-rolap-engine
- Grafana: Integrating Grafana with ClickHouse
- Cumul.io
- Tablum: https://tablum.io
7 - CatBoost / MindsDB / Fast.ai
Info
Article is based on feedback provided by one of Altinity clients.CatBoost:
- It uses gradient boosting - a hard to use technique which can outperform neural networks. Gradient boosting is powerful but it’s easy to shoot yourself in the foot using it.
- The documentation on how to use it is quite lacking. The only good source of information on how to properly configure a model to yield good results is this video: https://www.youtube.com/watch?v=usdEWSDisS0 . We had to dig around GitHub issues to find out how to make it work with ClickHouse®.
- CatBoost is fast. Other libraries will take ~5X to ~10X as long to do what CatBoost does.
- CatBoost will do preprocessing out of the box (fills nulls, apply standard scaling, encodes strings as numbers).
- CatBoost has all functions you’d need (metrics, plotters, feature importance)
It makes sense to split what CatBoost does into 2 parts:
- preprocessing (fills nulls, apply standard scaling, encodes strings as numbers)
- number crunching (convert preprocessed numbers to another number - ex: revenue of impression)
Compared to Fast.ai , CatBoost pre-processing is as simple to use and produces results that can be as good as Fast.ai .
The number crunching part of Fast.ai is no-config. For CatBoost you need to configure it, a lot.
CatBoost won’t simplify or hide any complexity of the process. So you need to know data science terms and what it does (ex: if your model is underfitting you can use a smaller l2_reg parameter in the model constructor).
In the end both Fast.ai and CatBoost can yield comparable results.
Regarding deploying models, CatBoost is really good. The model runs fast, it has a simple binary format which can be loaded in ClickHouse, C, or Python and it will encapsulate pre-processing with the binary file. Deploying Fast.ai models at scale/speed is impossible out of the box (we have our custom solution to do it which is not simple).
TLDR: CatBoost is fast, produces awesome models, is super easy to deploy and it’s easy to use/train (after becoming familiar with it despite the bad documentation & if you know data science terms).
Regarding MindsDB
The project seems to be a good idea but it’s too young. I was using the GUI version and I’ve encountered some bugs, and none of those bugs have a good error message.
It won’t show data in preview.
The “download” button won’t work.
It’s trying to create and drop tables in ClickHouse without me asking it to.
Other than bugs:
- It will only use 1 core to do everything (training, analysis, download).
- Analysis will only run with a very small subset of data, if I use something like 1M rows it never finishes.
Training a model on 100k rows took 25 minutes - (CatBoost takes 90s to train with 1M rows)
The model trained on MindsDB is way worse. It had r-squared of 0.46 (CatBoost=0.58)
To me it seems that they are a plugin which connects ClickHouse to MySQL to run the model in Pytorch.
It’s too complex and hard to debug and understand. The resulting model is not good enough.
TLDR: Easy to use (if bugs are ignored), too slow to train & produces a bad model.
8 - Google S3 (GCS)
GCS with the table function - seems to work correctly for simple scenarios.
Essentially you can follow the steps from the Migrating from Amazon S3 to Cloud Storage .
- Set up a GCS bucket.
- This bucket must be set as part of the default project for the account. This configuration can be found in settings -> interoperability.
- Generate a HMAC key for the account, can be done in settings -> interoperability, in the section for user account access keys.
- In ClickHouse®, replace the S3 bucket endpoint with the GCS bucket endpoint This must be done with the path-style GCS endpoint:
https://storage.googleapis.com/BUCKET_NAME/OBJECT_NAME. - Replace the aws access key id and aws secret access key with the corresponding parts of the HMAC key.
9 - Kafka engine
librdkafka changelog
This changelog tracks the librdkafka version bundled with ClickHouse and notable related fixes.
git log -- contrib/librdkafka | git name-rev --stdin
| ClickHouse® version | librdkafka version |
|---|---|
| 25.3+ (#63697 ) | 2.8.0 + few fixes |
| 21.10+ (#27883 ) | 1.6.1 + snappy fixes + boring ssl + illumos_build fixes + edenhill#3279 fix |
| 21.6+ (#23874 ) | 1.6.1 + snappy fixes + boring ssl + illumos_build fixes |
| 21.1+ (#18671 ) | 1.6.0-RC3 + snappy fixes + boring ssl |
| 20.13+ (#18053 ) | 1.5.0 + msan fixes + snappy fixes + boring ssl |
| 20.7+ (#12991 ) | 1.5.0 + msan fixes |
| 20.5+ (#11256 ) | 1.4.2 |
| 20.2+ (#9000 ) | 1.3.0 |
| 19.11+ (#5872 ) | 1.1.0 |
| 19.5+ (#4799 ) | 1.0.0 |
| 19.1+ (#4025 ) | 1.0.0-RC5 |
| v1.1.54382+ (#2276 ) | 0.11.4 |
9.1 - Fundamentals
9.1.1 - Config by provider
Sometimes the consumer group needs to be explicitly allowed in the broker UI config.
Read Adjusting librdkafka settings first, then apply the provider-specific settings below.
Amazon MSK | SASL/SCRAM
<yandex>
  <kafka>
    <security_protocol>sasl_ssl</security_protocol>
    <!-- Depending on your broker config you may need to uncomment below sasl_mechanism -->
    <!-- <sasl_mechanism>SCRAM-SHA-512</sasl_mechanism> -->
    <sasl_username>root</sasl_username>
    <sasl_password>toor</sasl_password>
  </kafka>
</yandex>
- Broker ports detail
- Read here more (Russian language)
on-prem / self-hosted Kafka broker
<yandex>
  <kafka>
    <security_protocol>sasl_ssl</security_protocol>
    <sasl_mechanism>SCRAM-SHA-512</sasl_mechanism>
    <sasl_username>root</sasl_username>
    <sasl_password>toor</sasl_password>
    <!-- fullchain cert here -->
    <ssl_ca_location>/path/to/cert/fullchain.pem</ssl_ca_location>
  </kafka>
</yandex>
Inline Kafka certs
To connect to some Kafka cloud services you may need to use certificates.
If needed they can be converted to pem format and inlined into ClickHouse® config.xml Example:
<kafka>
<ssl_key_pem><![CDATA[
  RSA Private-Key: (3072 bit, 2 primes)
    ....
-----BEGIN RSA PRIVATE KEY-----
...
-----END RSA PRIVATE KEY-----
]]></ssl_key_pem>
<ssl_certificate_pem><![CDATA[
-----BEGIN CERTIFICATE-----
...
-----END CERTIFICATE-----
]]></ssl_certificate_pem>
</kafka>
See
https://help.aiven.io/en/articles/489572-getting-started-with-aiven-kafka
https://stackoverflow.com/questions/991758/how-to-get-pem-file-from-key-and-crt-files
Azure Event Hub
See https://github.com/ClickHouse/ClickHouse/issues/12609
Confluent Cloud / Google Cloud
<yandex>
  <kafka>
    <auto_offset_reset>smallest</auto_offset_reset>
    <security_protocol>SASL_SSL</security_protocol>
    <!-- older broker versions may need this below, for newer versions ignore -->
    <!-- <ssl_endpoint_identification_algorithm>https</ssl_endpoint_identification_algorithm> -->
    <sasl_mechanism>PLAIN</sasl_mechanism>
    <sasl_username>username</sasl_username>
    <sasl_password>password</sasl_password>
    <!-- Same as above here ignore if newer broker version -->
    <!-- <ssl_ca_location>probe</ssl_ca_location> -->
  </kafka>
</yandex>
9.1.2 - Kafka engine Virtual columns
Kafka engine virtual columns (built-in)
From the Kafka engine docs , the supported virtual columns are:
_topic— Kafka topic (LowCardinality(String))_key— message key (String)_offset— message offset (UInt64)_timestamp— message timestamp (Nullable(DateTime))_timestamp_ms— timestamp with millisecond precision (Nullable(DateTime64(3)))_partition— partition (UInt64)_headers.name— header keys (Array(String))_headers.value— header values (Array(String))
Extra virtual columns when you enable parse-error streaming:
If you set kafka_handle_error_mode='stream', ClickHouse adds:
_raw_message— the raw message that failed to parse (String)_error— the exception message from parsing failure (String)
Note: _raw_message and _error are populated only when parsing fails; otherwise they’re empty.
We can use these columns in a materialized view like this for example:
9.1.3 - Adjusting librdkafka settings
- To set rdkafka options - add to
<kafka>section inconfig.xmlor preferably use a separate file inconfig.d/:
Some random example using SSL certificates to authenticate:
<yandex>
    <kafka>
        <max_poll_interval_ms>60000</max_poll_interval_ms>
        <session_timeout_ms>60000</session_timeout_ms>
        <heartbeat_interval_ms>10000</heartbeat_interval_ms>
        <reconnect_backoff_ms>5000</reconnect_backoff_ms>
        <reconnect_backoff_max_ms>60000</reconnect_backoff_max_ms>
        <request_timeout_ms>20000</request_timeout_ms>
        <retry_backoff_ms>500</retry_backoff_ms>
        <message_max_bytes>20971520</message_max_bytes>
        <debug>all</debug><!-- only to get the errors -->
        <security_protocol>SSL</security_protocol>
        <ssl_ca_location>/etc/clickhouse-server/ssl/kafka-ca-qa.crt</ssl_ca_location>
        <ssl_certificate_location>/etc/clickhouse-server/ssl/client_clickhouse_client.pem</ssl_certificate_location>
        <ssl_key_location>/etc/clickhouse-server/ssl/client_clickhouse_client.key</ssl_key_location>
        <ssl_key_password>pass</ssl_key_password>
    </kafka>
</yandex>
Authentication / connectivity
Sometimes the consumer group needs to be explicitly allowed in the broker UI config.
Use general Kafka/librdkafka settings from this page first, then apply provider-specific options from Config by provider .
Kerberos
- https://clickhouse.tech/docs/en/engines/table-engines/integrations/kafka/#kafka-kerberos-support
- https://github.com/ClickHouse/ClickHouse/blob/master/tests/integration/test_storage_kerberized_kafka/configs/kafka.xml
  <!-- Kerberos-aware Kafka -->
  <kafka>
    <security_protocol>SASL_PLAINTEXT</security_protocol>
    <sasl_kerberos_keytab>/home/kafkauser/kafkauser.keytab</sasl_kerberos_keytab>
    <sasl_kerberos_principal>kafkauser/kafkahost@EXAMPLE.COM</sasl_kerberos_principal>
  </kafka>
How to test connection settings
Use kafkacat utility - it internally uses same library to access Kafla as ClickHouse itself and allows easily to test different settings.
kafkacat -b my_broker:9092 -C -o -10 -t my_topic \ (Google cloud and on-prem use 9092 port)
   -X security.protocol=SASL_SSL  \
   -X sasl.mechanisms=PLAIN \
   -X sasl.username=uerName \
   -X sasl.password=Password
Different configurations for different tables?
Is there some more documentation how to use this multiconfiguration for Kafka ?
The whole logic is here: https://github.com/ClickHouse/ClickHouse/blob/da4856a2be035260708fe2ba3ffb9e437d9b7fef/src/Storages/Kafka/StorageKafka.cpp#L466-L475
So it load the main config first, after that it load (with overwrites) the configs for all topics, listed in kafka_topic_list of the table.
Also since v21.12 it’s possible to use more straightforward way using named_collections: https://github.com/ClickHouse/ClickHouse/pull/31691
So you can write a config file something like this:
<clickhouse>
 <named_collections>
  <kafka_preset1>
   <kafka_broker_list>kafka1:19092</kafka_broker_list>
   <kafka_topic_list>conf</kafka_topic_list>
   <kafka_group_name>conf</kafka_group_name>
  </kafka_preset1>
 </named_collections>
</clickhouse>


<clickhouse>
    <named_collections>
        <kafka_preset2>
            <kafka_broker_list>...</kafka_broker_list>
            <kafka_topic_list>foo.bar</kafka_topic_list>
            <kafka_group_name>foo.bar.group</kafka_group_name>
            <kafka>
                <security_protocol>...</security_protocol>
                <sasl_mechanism>...</sasl_mechanism>
                <sasl_username>...</sasl_username>
                <sasl_password>...</sasl_password>
                <auto_offset_reset>smallest</auto_offset_reset>
                <ssl_endpoint_identification_algorithm>https</ssl_endpoint_identification_algorithm>
                <ssl_ca_location>probe</ssl_ca_location>
            </kafka>
        </kafka_preset2>
    </named_collections>
</clickhouse>
And after execute:
CREATE TABLE test.kafka (key UInt64, value UInt64) ENGINE = Kafka(kafka_preset1, kafka_format='CSV');
The same named collections can be created with SQL from v24.2+:
CREATE NAMED COLLECTION kafka_preset1 AS
    kafka_broker_list = 'kafka1:19092',
    kafka_topic_list = 'conf',
    kafka_group_name = 'conf';
CREATE NAMED COLLECTION kafka_preset2 AS
    kafka_broker_list = '...',
    kafka_topic_list = 'foo.bar',
    kafka_group_name = 'foo.bar.group',
    kafka.security_protocol = 'SASL_SSL',
    kafka.sasl_mechanism = 'PLAIN',
    kafka.sasl_username = '...',
    kafka.sasl_password = '...',
    kafka.auto_offset_reset = 'smallest',
    kafka.ssl_endpoint_identification_algorithm = 'https',
    kafka.ssl_ca_location = 'probe';
You can verify SQL-created named collections via:
SELECT
    name,
    source,
    create_query
FROM system.named_collections
WHERE name IN ('kafka_preset1', 'kafka_preset2');
and remove them with:
DROP NAMED COLLECTION kafka_preset1;
DROP NAMED COLLECTION kafka_preset2;
The same fragment of code in newer versions:
9.1.4 - Kafka main parsing loop
One of the threads from scheduled_pool (pre ClickHouse® 20.9) / background_message_broker_schedule_pool (after 20.9) do that in infinite loop:
- Batch poll (time limit:
kafka_poll_timeout_ms500ms, messages limit:kafka_poll_max_batch_size65536) - Parse messages.
- If we don’t have enough data (rows limit:
kafka_max_block_size1048576) or time limit reached (kafka_flush_interval_ms7500ms) - continue polling (goto p.1) - Write a collected block of data to MV
- Do commit (commit after write = at-least-once).
On any error, during that process, Kafka client is restarted (leading to rebalancing - leave the group and get back in few seconds).

Important settings
These usually should not be adjusted:
kafka_poll_max_batch_size= max_block_size (65536)kafka_poll_timeout_ms= stream_poll_timeout_ms (500ms)
You may want to adjust those depending on your scenario:
kafka_flush_interval_ms= stream_flush_interval_ms (7500ms)kafka_max_block_size= max_insert_block_size / kafka_num_consumers (for the single consumer: 1048576)
See also
https://github.com/ClickHouse/ClickHouse/pull/11388
Disable at-least-once delivery
kafka_commit_every_batch = 1 will change the loop logic mentioned above. Consumed batch committed to the Kafka and the block of rows send to Materialized Views only after that. It could be resembled as at-most-once delivery mode as prevent duplicate creation but allow loss of data in case of failures.
9.1.5 - SELECTs from engine=Kafka
Question
What will happen, if we would run SELECT query from working Kafka table with MV attached? Would data showed in SELECT query appear later in MV destination table?
Answer
- Most likely SELECT query would show nothing.
- If you lucky enough and something would show up, those rows wouldn’t appear in MV destination table.
So it’s not recommended to run SELECT queries on working Kafka tables.
In case of debug it’s possible to use another Kafka table with different consumer_group, so it wouldn’t affect your main pipeline.
9.2 - Consumption Patterns
9.2.1 - Exactly once semantics
EOS consumer (isolation.level=read_committed) is enabled by default since librdkafka 1.2.0, so for ClickHouse® - since 20.2
See:
BUT: while EOS semantics will guarantee you that no duplicates will happen on the Kafka side (i.e. even if you produce the same messages few times it will be consumed once), but ClickHouse as a Kafka client can currently guarantee only at-least-once. And in some corner cases (connection lost etc) you can get duplicates.
We need to have something like transactions on ClickHouse side to be able to avoid that. Adding something like simple transactions is in plans for Y2022.
block-aggregator by eBay
Block Aggregator is a data loader that subscribes to Kafka topics, aggregates the Kafka messages into blocks that follow the ClickHouse’s table schemas, and then inserts the blocks into ClickHouse. Block Aggregator provides exactly-once delivery guarantee to load data from Kafka to ClickHouse. Block Aggregator utilizes Kafka’s metadata to keep track of blocks that are intended to send to ClickHouse, and later uses this metadata information to deterministically re-produce ClickHouse blocks for re-tries in case of failures. The identical blocks are guaranteed to be deduplicated by ClickHouse.
9.2.2 - Kafka parallel consuming
For very large topics when you need more parallelism (especially on the insert side) you may use several tables with the same pipeline (pre ClickHouse® 20.9) or enable kafka_thread_per_consumer (after 20.9).
kafka_num_consumers = N,
kafka_thread_per_consumer=1
Notes:
- the inserts will happen in parallel (without that setting inserts happen linearly)
- enough partitions are needed.
kafka_num_consumersis limited by number of physical cores (half of vCPUs).kafka_disable_num_consumers_limitcan be used to override the limit.background_message_broker_schedule_pool_sizeis 16 by default, you may need to increase if using more than 16 consumers
Before increasing kafka_num_consumers with keeping kafka_thread_per_consumer=0 may improve consumption & parsing speed, but flushing & committing still happens by a single thread there (so inserts are linear).
9.2.3 - Multiple MVs attached to Kafka table
Kafka Consumer is a thread inside the Kafka Engine table that is visible by Kafka monitoring tools like kafka-consumer-groups and in Clickhouse in system.kafka_consumers table.
Having multiple consumers increases ingesting parallelism and can significantly speed up event processing. However, it comes with a trade-off: it’s a CPU-intensive task, especially under high event load and/or complicated parsing of incoming data. Therefore, it’s crucial to create as many consumers as you really need and ensure you have enough CPU cores to handle them. We don’t recommend creating too many Kafka Engines per server because it could lead to uncontrolled CPU usage in situations like bulk data upload or catching up a huge kafka lag due to excessive parallelism of the ingesting process.
kafka_thread_per_consumer meaning
Consider a basic pipeline depicted as a Kafka table with 2 MVs attached. The Kafka broker has 2 topics and 4 partitions.
kafka_thread_per_consumer = 0
Kafka engine table will act as 2 consumers, but only 1 insert thread for both of them. It is important to note that the topic needs to have as many partitions as consumers. For this scenario, we use these settings:
kafka_num_consumers = 2
kafka_thread_per_consumer = 0
The same Kafka engine will create 2 streams, 1 for each consumer, and will join them in a union stream. And it will use 1 thread for inserting [ 2385 ]
This is how we can see it in the logs:
2022.11.09 17:49:34.282077 [ 2385 ] {} <Debug> StorageKafka (kafka_table): Started streaming to 2 attached views
How ClickHouse® calculates the number of threads depending on the
thread_per_consumersetting:auto stream_count = thread_per_consumer ? 1 : num_created_consumers; sources.reserve(stream_count); pipes.reserve(stream_count); for (size_t i = 0; i < stream_count; ++i) { ...... }
Details:
Also, a detailed graph of the pipeline:
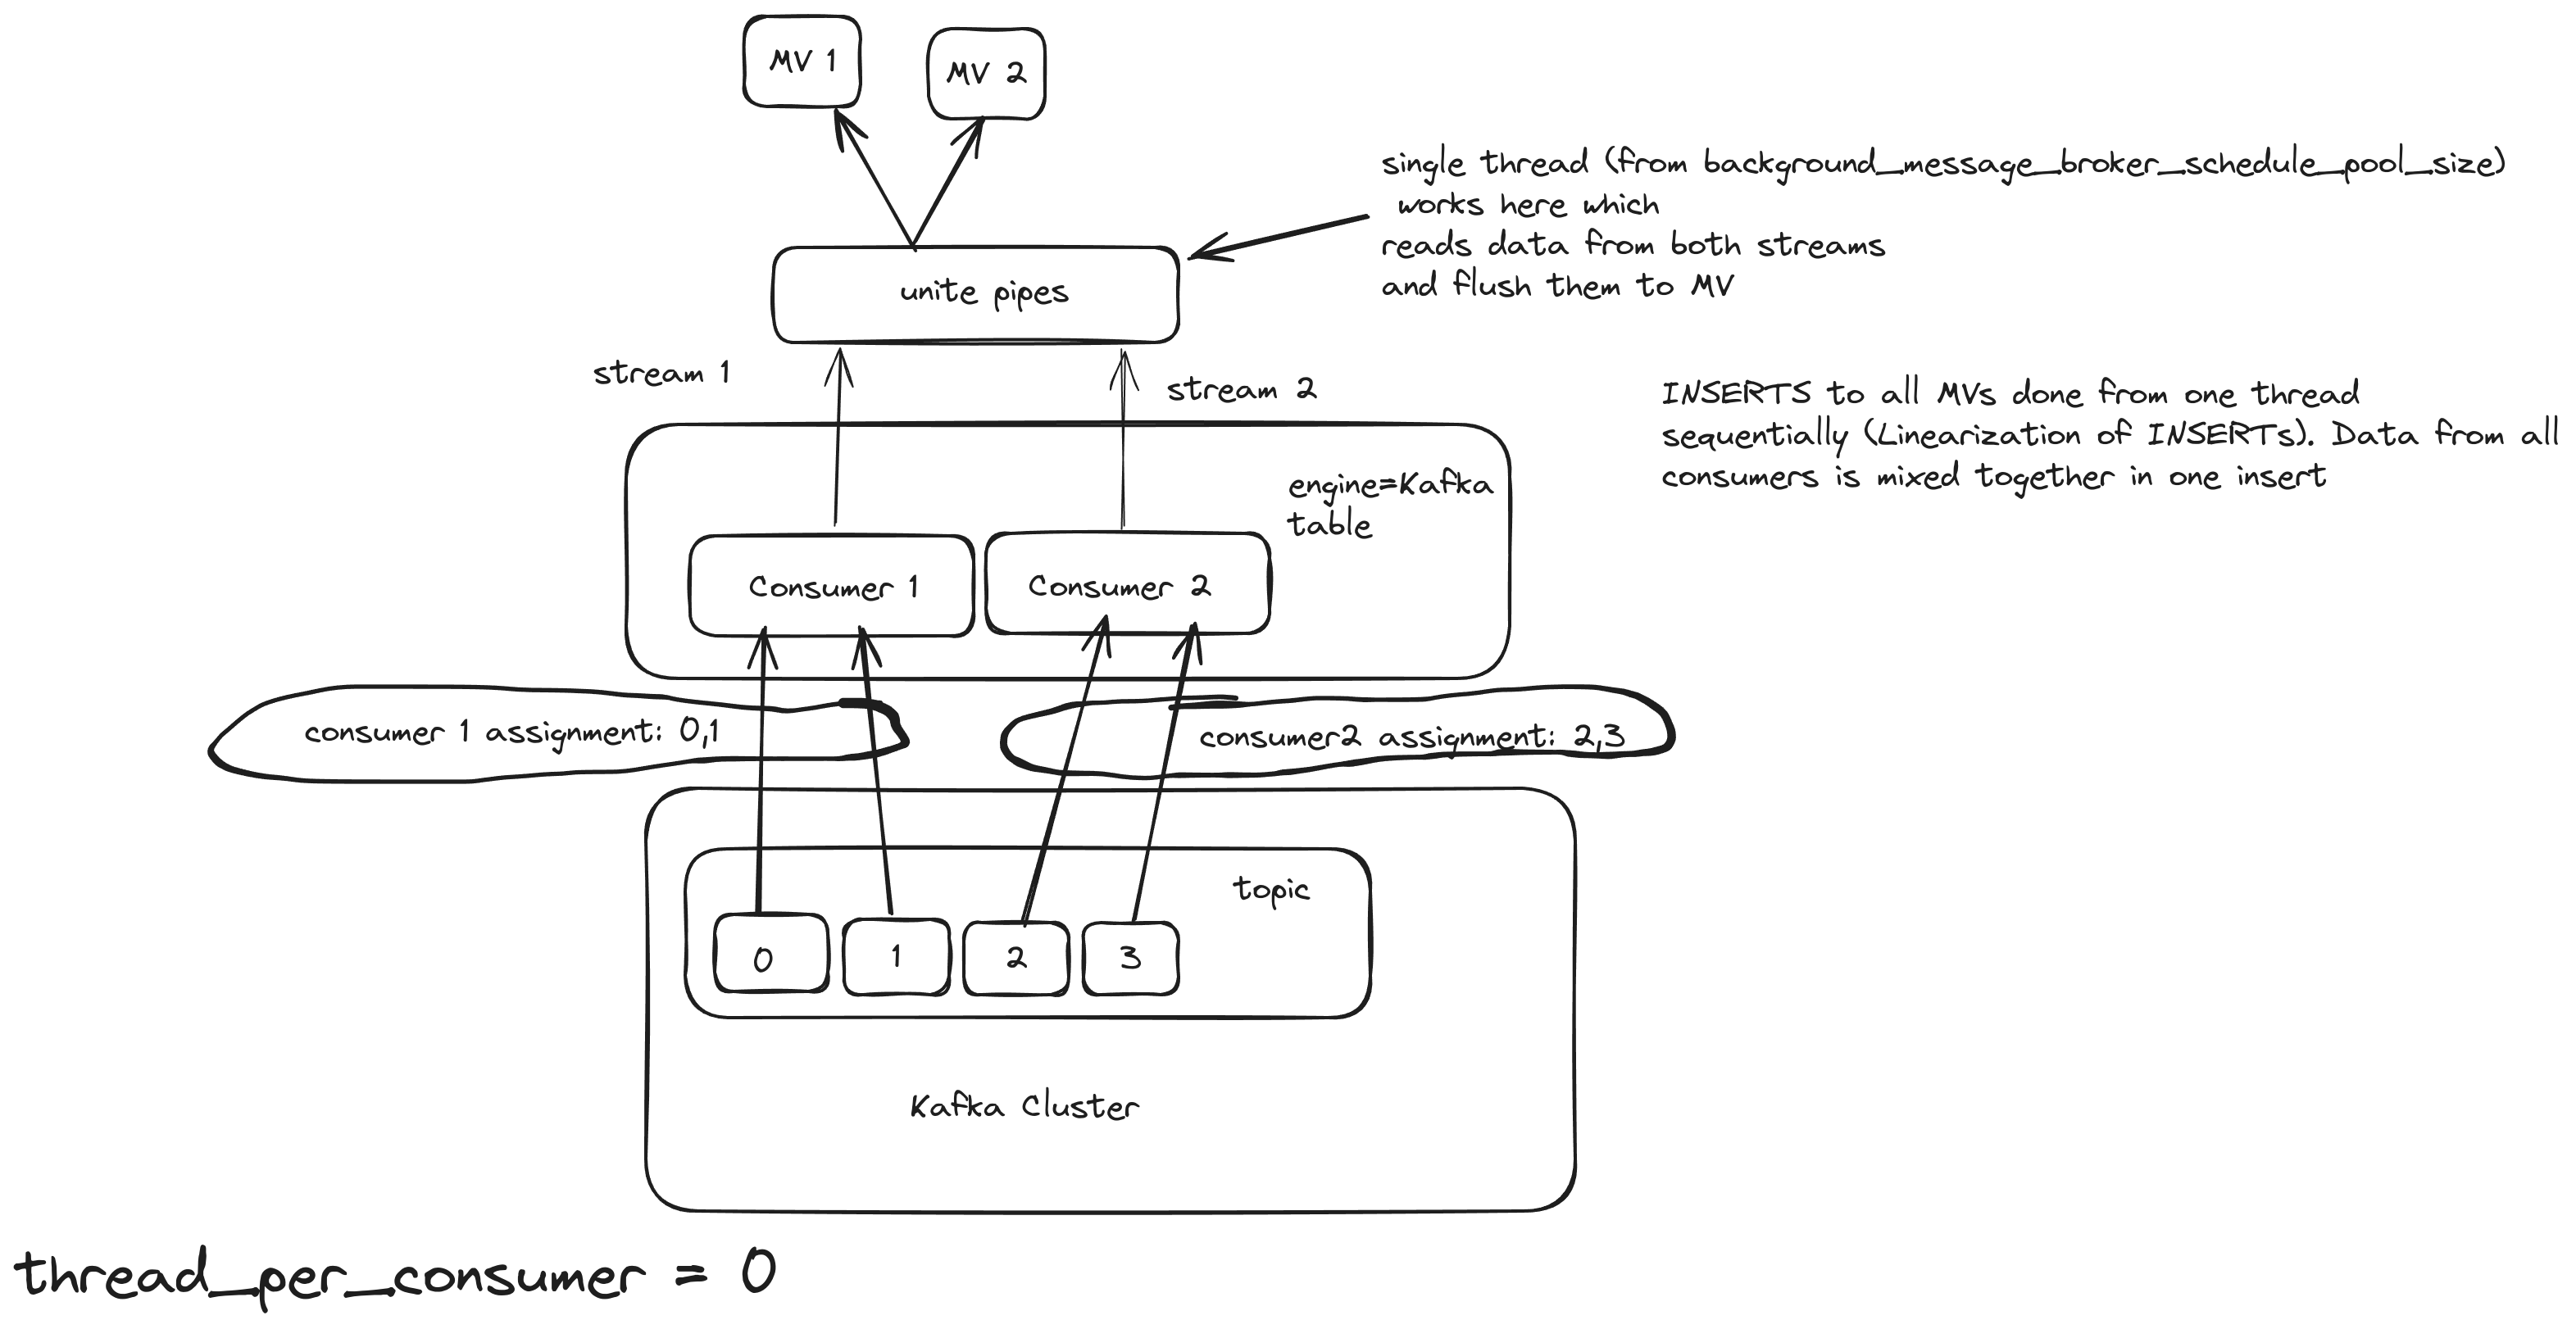
With this approach, even if the number of consumers increased, the Kafka engine will still use only 1 thread to flush. The consuming/processing rate will probably increase a bit, but not linearly. For example, 5 consumers will not consume 5 times faster. Also, a good property of this approach is the linearization of INSERTS, which means that the order of the inserts is preserved and sequential. This option is good for small/medium Kafka topics.
kafka_thread_per_consumer = 1
Kafka engine table will act as 2 consumers and 1 thread per consumer. For this scenario, we use these settings:
kafka_num_consumers = 2
kafka_thread_per_consumer = 1
Here, the pipeline works like this:

With this approach, the number of consumers remains the same, but each consumer will use their own insert/flush thread, and the consuming/processing rate should increase.
Background Pool
In Clickhouse there is a special thread pool for background processes, such as streaming engines. Its size is controlled by the background_message_broker_schedule_pool_size setting and is 16 by default. If you exceed this limit across all tables on the server, you’ll likely encounter continuous Kafka rebalances, which will slow down processing considerably. For a server with a lot of CPU cores, you can increase that limit to a higher value, like 20 or even 40. background_message_broker_schedule_pool_size = 20 allows you to create 5 Kafka Engine tables with 4 consumers each of them has its own insert thread. This option is good for large Kafka topics with millions of messages per second.
Multiple Materialized Views
Attaching multiple Materialized Views (MVs) to a Kafka Engine table can be used when you need to apply different transformations to the same topic and store the resulting data in different tables.
(This approach also applies to the other streaming engines - RabbitMQ, s3queue, etc).
All streaming engines begin processing data (reading from the source and producing insert blocks) only after at least one Materialized View is attached to the engine. Multiple Materialized Views can be connected to distribute data across various tables with different transformations. But how does it work when the server starts?
Once the first Materialized View (MV) is loaded, started, and attached to the Kafka/s3queue table, data consumption begins immediately—data is read from the source, pushed to the destination, and the pointers advance to the next position. However, any other MVs that haven’t started yet will miss the data consumed by the first MV, leading to some data loss.
This issue worsens with asynchronous table loading. Tables are only loaded upon first access, and the loading process takes time. When multiple MVs direct the data stream to different tables, some tables might be ready sooner than others. As soon as the first table becomes ready, data consumption starts, and any tables still loading will miss the data consumed during that interval, resulting in further data loss for those tables.
That means when you make a design with Multiple MVs async_load_databases should be switched off:
<async_load_databases>false</async_load_databases>
Also, you have to prevent starting to consume until all MVs are loaded and started. For that, you can add an additional Null table to the MV pipeline, so the Kafka table will pass the block to a single Null table first, and only then many MVs start their own transformations to many dest tables:
KafkaTable → dummy_MV -> NullTable -> [MV1, MV2, ….] → [Table1, Table2, …]
create table NullTable Engine=Null as KafkaTable;
create materialized view dummy_MV to NullTable
select * from KafkaTable
--WHERE NOT ignore(throwIf(if((uptime() < 120), 1 , 0)))
WHERE NOT ignore(throwIf(if((uptime() < 120), 1 + sleep(3), 0)))
120 seconds should be enough for loading all MVs.
Using an intermediate Null table is also preferable because it’s easier to make any changes with MVs:
- drop the dummy_MV to stop consuming
- make any changes to transforming MVs by drop/recreate
- create dummy_MV again to resume consuming
The fix for correctly starting multiple MVs will be available from 25.5 version - https://github.com/ClickHouse/ClickHouse/pull/72123
9.2.4 - Rewind / fast-forward / replay
- Step 1: Detach Kafka tables in ClickHouse®
DETACH TABLE db.kafka_table_name ON CLUSTER '{cluster}'; - Step 2:
kafka-consumer-groups.sh --bootstrap-server kafka:9092 --topic topic:0,1,2 --group id1 --reset-offsets --to-latest --execute - Step 3: Attach Kafka tables back
ATTACH TABLE db.kafka_table_name ON CLUSTER '{cluster}';
See also these configuration settings:
<kafka>
  <auto_offset_reset>smallest</auto_offset_reset>
</kafka>
About Offset Consuming
When a consumer joins the consumer group, the broker will check if it has a committed offset. If that is the case, then it will start from the latest offset. Both ClickHouse and librdKafka documentation state that the default value for auto_offset_reset is largest (or latest in new Kafka versions) but it is not, if the consumer is new:
conf.set("auto.offset.reset", "earliest"); // If no offset stored for this group, read all messages from the start
If there is no offset stored or it is out of range, for that particular consumer group, the consumer will start consuming from the beginning (earliest), and if there is some offset stored then it should use the latest.
The log retention policy influences which offset values correspond to the earliest and latest configurations. Consider a scenario where a topic has a retention policy set to 1 hour. Initially, you produce 5 messages, and then, after an hour, you publish 5 more messages. In this case, the latest offset will remain unchanged from the previous example. However, due to Kafka removing the earlier messages, the earliest available offset will not be 0; instead, it will be 5.
9.3 - Schema and Formats
9.3.1 - Inferring Schema from AvroConfluent Messages in Kafka for ClickHouse®
To consume messages from Kafka within ClickHouse®, you need to define the ENGINE=Kafka table structure with all the column names and types.
This task can be particularly challenging when dealing with complex Avro messages, as manually determining the exact schema for
ClickHouse is both tricky and time-consuming. This complexity is particularly frustrating in the case of Avro formats,
where the column names and their types are already clearly defined in the schema registry.
Although ClickHouse supports schema inference for files, it does not natively support this for Kafka streams.
Here’s a workaround to infer the schema using AvroConfluent messages:
Step 1: Capture and Store a Raw Kafka Message
First, create a table in ClickHouse to consume a raw message from Kafka and store it as a file:
CREATE TABLE test_kafka (raw String) ENGINE = Kafka
SETTINGS kafka_broker_list = 'localhost:29092',
         kafka_topic_list = 'movies-raw',
         kafka_format = 'RawBLOB', -- Don't try to parse the message, return it 'as is'
         kafka_group_name = 'tmp_test'; -- Using some dummy consumer group here.

INSERT INTO FUNCTION file('./avro_raw_sample.avro', 'RawBLOB')
SELECT * FROM test_kafka LIMIT 1
SETTINGS max_block_size=1, stream_like_engine_allow_direct_select=1;

DROP TABLE test_kafka;
Step 2: Infer Schema Using the Stored File
Using the stored raw message, let ClickHouse infer the schema based on the AvroConfluent format and a specified schema registry URL:
CREATE TEMPORARY TABLE test AS
SELECT * FROM file('./avro_raw_sample.avro', 'AvroConfluent')
SETTINGS format_avro_schema_registry_url='http://localhost:8085';

SHOW CREATE TEMPORARY TABLE test\G;
The output from the SHOW CREATE command will display the inferred schema, for example:
Row 1:
──────
statement: CREATE TEMPORARY TABLE test
(
    `movie_id` Int64,
    `title` String,
    `release_year` Int64
)
ENGINE = Memory
Step 3: Create the Kafka Table with the Inferred Schema
Now, use the inferred schema to create the Kafka table:
CREATE TABLE movies_kafka
(
    `movie_id` Int64,
    `title` String,
    `release_year` Int64
)
ENGINE = Kafka
SETTINGS kafka_broker_list = 'localhost:29092',
         kafka_topic_list = 'movies-raw',
         kafka_format = 'AvroConfluent',
         kafka_group_name = 'movies',
         kafka_schema_registry_url = 'http://localhost:8085';
This approach reduces manual schema definition efforts and enhances data integration workflows by utilizing the schema inference capabilities of ClickHouse for AvroConfluent messages.
Appendix
Avro is a binary serialization format used within Apache Kafka for efficiently serializing data with a compact binary format. It relies on schemas, which define the structure of the serialized data, to ensure robust data compatibility and type safety.
Schema Registry is a service that provides a centralized repository for Avro schemas. It helps manage and enforce schemas across applications, ensuring that the data exchanged between producers and consumers adheres to a predefined format, and facilitates schema evolution in a safe manner.
In ClickHouse, the Avro format is used for data that contains the schema embedded directly within the file or message. This means the structure of the data is defined and included with the data itself, allowing for self-describing messages. However, embedding the schema within every message is not optimal for streaming large volumes of data, as it increases the workload and network overhead. Repeatedly passing the same schema with each message can be inefficient, particularly in high-throughput environments.
On the other hand, the AvroConfluent format in ClickHouse is specifically designed to work with the Confluent Schema Registry. This format expects the schema to be managed externally in a schema registry rather than being embedded within each message. It retrieves schema information from the Schema Registry, which allows for centralized schema management and versioning, facilitating easier schema evolution and enforcement across different applications using Kafka.
9.4 - Operations and Troubleshooting
9.4.1 - Setting the background message broker schedule pool size
background_message_broker_schedule_pool_size setting for Kafka, RabbitMQ, and NATS table engines in your database.Overview
When using Kafka, RabbitMQ, or NATS table engines in ClickHouse®, you may encounter issues related to a saturated background thread pool. One common symptom is a warning similar to the following:
2025.03.14 08:44:26.725868 [ 344 ] {} <Warning> StorageKafka (events_kafka): [rdk:MAXPOLL] [thrd:main]: Application maximum poll interval (60000ms) exceeded by 159ms (adjust max.poll.interval.ms for long-running message processing): leaving group
This warning typically appears not because ClickHouse fails to poll, but because there are no available threads in the background pool to handle the polling in time. In rare cases, the same error might also be caused by long flushing operations to Materialized Views (MVs), especially if their logic is complex or chained.
To resolve this, you should monitor and, if needed, increase the value of the background_message_broker_schedule_pool_size setting.
Step 1: Check Thread Pool Utilization
Run the following SQL query to inspect the current status of your background message broker thread pool:
SELECT
    (
        SELECT value
        FROM system.metrics
        WHERE metric = 'BackgroundMessageBrokerSchedulePoolTask'
    ) AS tasks,
    (
        SELECT value
        FROM system.metrics
        WHERE metric = 'BackgroundMessageBrokerSchedulePoolSize'
    ) AS pool_size,
    pool_size - tasks AS free_threads
If you have metric_log enabled, you can also monitor the minimum number of free threads over the day:
SELECT min(CurrentMetric_BackgroundMessageBrokerSchedulePoolSize - CurrentMetric_BackgroundMessageBrokerSchedulePoolTask) AS min_free_threads
FROM system.metric_log
WHERE event_date = today()
If free_threads is close to zero or negative, it means your thread pool is saturated and should be increased.
Step 2: Estimate Required Pool Size
To estimate a reasonable value for background_message_broker_schedule_pool_size, run the following query:
WITH
    toUInt32OrDefault(extract(engine_full, 'kafka_num_consumers\s*=\s*(\d+)')) as kafka_num_consumers,
    extract(engine_full, 'kafka_thread_per_consumer\s*=\s*(\d+|\'true\')') not in ('', '0') as kafka_thread_per_consumer,
    multiIf(
        engine = 'Kafka',
            if(kafka_thread_per_consumer AND kafka_num_consumers > 0, kafka_num_consumers, 1),
        engine = 'RabbitMQ',
            3,
        engine = 'NATS',
            3,
        0 /* should not happen */
    ) as threads_needed
SELECT
    ceil(sum(threads_needed) * 1.25)
FROM
    system.tables
WHERE
    engine in ('Kafka', 'RabbitMQ', 'NATS')
This will return an estimate that includes a 25% buffer to accommodate spikes in load.
Step 3: Apply the New Setting
Create or update the following configuration file:
Path:
/etc/clickhouse-server/config.d/background_message_broker_schedule_pool_size.xmlContent:
<yandex>
    <background_message_broker_schedule_pool_size>120</background_message_broker_schedule_pool_size>
</yandex>
Replace
120with the value recommended from Step 2 (rounded up if needed).(Only for ClickHouse versions 23.8 and older)
Add the same setting to the default user profile:
Path:
/etc/clickhouse-server/users.d/background_message_broker_schedule_pool_size.xmlContent:
<yandex>
    <profiles>
        <default>
            <background_message_broker_schedule_pool_size>120</background_message_broker_schedule_pool_size>
        </default>
    </profiles>
</yandex>
Step 4: Restart ClickHouse
After applying the configuration, restart ClickHouse to apply the changes:
sudo systemctl restart clickhouse-server
Summary
A saturated background message broker thread pool can lead to missed Kafka polls and consumer group dropouts. Monitoring your metrics and adjusting background_message_broker_schedule_pool_size accordingly ensures stable operation of Kafka, RabbitMQ, and NATS integrations.
If the problem persists even after increasing the pool size, consider investigating slow MV chains or flushing logic as a potential bottleneck.
9.4.2 - Error handling
Pre 21.6
There are couple options:
Certain formats which has schema in built in them (like JSONEachRow) could silently skip any unexpected fields after enabling setting input_format_skip_unknown_fields
It’s also possible to skip up to N malformed messages for each block, with used setting kafka_skip_broken_messages but it’s also does not support all possible formats.
After 21.6
It’s possible to stream messages which could not be parsed, this behavior could be enabled via setting: kafka_handle_error_mode='stream' and ClickHouse® wil write error and message from Kafka itself to two new virtual columns: _error, _raw_message.
So you can create another Materialized View which would collect to a separate table all errors happening while parsing with all important information like offset and content of message.
CREATE TABLE default.kafka_engine
(
    `i` Int64,
    `s` String
)
ENGINE = Kafka
SETTINGS kafka_broker_list = 'kafka:9092'
kafka_topic_list = 'topic',
kafka_group_name = 'clickhouse',
kafka_format = 'JSONEachRow',
kafka_handle_error_mode='stream';

CREATE TABLE default.kafka_errors
(
    `topic` String,
    `partition` Int64,
    `offset` Int64,
    `raw` String,
    `error` String
)
ENGINE = MergeTree
ORDER BY (topic, partition, offset)
SETTINGS index_granularity = 8192


CREATE MATERIALIZED VIEW default.kafka_errors_mv TO default.kafka_errors
AS
SELECT
    _topic AS topic,
    _partition AS partition,
    _offset AS offset,
    _raw_message AS raw,
    _error AS error
FROM default.kafka_engine
WHERE length(_error) > 0
https://github.com/ClickHouse/ClickHouse/pull/20249
https://github.com/ClickHouse/ClickHouse/pull/21850
https://altinity.com/blog/clickhouse-kafka-engine-faq
Since 25.8
dead letter queue can be used via setting: kafka_handle_error_mode='dead_letter_queue' https://github.com/ClickHouse/ClickHouse/pull/68873
and error related data will be saved in system.dead_letter_queue table.
10 - RabbitMQ
Settings
Basic RabbitMQ settings and use cases: https://clickhouse.com/docs/en/engines/table-engines/integrations/rabbitmq
Latest improvements/fixes
(v23.10+)
- Allow to save unparsed records and errors in RabbitMQ:
NATS and FileLog engines. Add virtual columns
_errorand_raw_message(for NATS and RabbitMQ),_raw_record(for FileLog) that are filled when ClickHouse fails to parse new record. The behaviour is controlled under storage settingsnats_handle_error_modefor NATS,rabbitmq_handle_error_modefor RabbitMQ,handle_error_modefor FileLog similar tokafka_handle_error_mode. If it’s set todefault, en exception will be thrown when ClickHouse fails to parse a record, if it’s set tostream, error and raw record will be saved into virtual columns. Closes #36035 and #55477
(v24+)
10.1 - RabbitMQ Error handling
Same approach as in Kafka but virtual columns are different. Check https://clickhouse.com/docs/en/engines/table-engines/integrations/rabbitmq#virtual-columns
CREATE TABLE IF NOT EXISTS rabbitmq.broker_errors_queue
(
  exchange_name String,
  channel_id String,
  delivery_tag UInt64,
  redelivered UInt8,
  message_id String,
  timestamp UInt64
)
engine = RabbitMQ
SETTINGS
    rabbitmq_host_port = 'localhost:5672',
    rabbitmq_exchange_name = 'exchange-test', -- required parameter even though this is done via the rabbitmq config
    rabbitmq_queue_consume = true,
    rabbitmq_queue_base = 'test-errors',
    rabbitmq_format = 'JSONEachRow',
    rabbitmq_username = 'guest',
    rabbitmq_password = 'guest',
    rabbitmq_handle_error_mode = 'stream';

CREATE MATERIALIZED VIEW IF NOT EXISTS rabbitmq.broker_errors_mv
(
  exchange_name String,
  channel_id String,
  delivery_tag UInt64,
  redelivered UInt8,
  message_id String,
  timestamp UInt64
  raw_message String,
  error String
)
ENGINE = MergeTree
ORDER BY (error)
SETTINGS index_granularity = 8192 AS
SELECT
  _exchange_name AS exchange_name,
  _channel_id AS channel_id,
  _delivery_tag AS delivery_tag,
  _redelivered AS redelivered,
  _message_id AS message_id,
  _timestamp AS timestamp,
  _raw_message AS raw_message,
  _error AS error
FROM rabbitmq.broker_errors_queue
WHERE length(_error) > 0